
Saturday, April 20, 2013

Spies in the Hotel Viru...
The very first time I ever visited Tallinn, Estonia, about 20 years ago back in the early '90s, I stayed in the Hotel Viru. It was a memorably bad experience. My bed was a straw-stuffed pallet placed on top of cinder blocks, and that was the highlight. I stayed in the Hotel Viru again, many years later, and had a much more pleasant experience.
On my first visit there, our Estonian (though ethnic Russian) hosts warned us about the bugging of the Hotel Viru – apparently it was well-known amongst the locals. Now 20 years later, here I am reading about it in the Smithsonian Magazine!
On my first visit there, our Estonian (though ethnic Russian) hosts warned us about the bugging of the Hotel Viru – apparently it was well-known amongst the locals. Now 20 years later, here I am reading about it in the Smithsonian Magazine!

FJ Cruiser: Grommets...
When I installed the roof lights on the FJ Cruiser, I ran the wires back through one of the steel tubes of the roof rack. At the time, I tried installing rubber grommets and running the wires through them, but that didn't work out at all – the wires couldn't be pushed through the starting grommet (rubber-on-rubber is a lot of friction!), and I couldn't fish them out of the ending grommet (that danged hole was too small!). So I just ran them through the bare metal, and figured I'd do something afterwards to fix them up.
Grommets (the rubber kind) serve several useful purposes. They help weatherproof the penetration, though generally grommets aren't completely waterproof on their own. But the most important thing they do is to keep the wire's insulation from being scraped off by the sharp metal of the penetration. That's vital, and I didn't want to drive very much without solving that issue.
My first idea was to somehow suspend the wires so they didn't touch the metal, then form some silicone RTV around them. Once the RTV cured, in effect I would have manufactured a custom (and completely weatherproof) grommet. But I know from experience that RTV doesn't stand up all that well under full sun and weather exposure, so I searched around and found another similar material that is supposed to handle outdoors exposure better. This material starts out with the consistency of Duco glue, though – not as viscous as RTV, and therefore not quite as “moldable”.
Then a crazy idea occurred to me. What if...I took an ordinary rubber grommet and snipped through it, so that I could thread it onto the wire already in place? Then I should be able to stuff it into the hole, surrounding the wire. Then I could coat it with this new-fangled sealant and I'd have the best of all worlds.
So I tried it. Bottom line: it worked. The details: oh, man, is it a pain in the patoot to stuff a rubber grommet into a hole already occupied by wires! I used a small flat-blade screwdriver to get enough pressure on it to pop it in, one tiny little piece at a time. It took me about 20 minutes per grommet to get them in, and I had 6 grommets to do. Once I had all the grommets in place, sealing them up was easy. The new sealant seems to stick to the rubber material just fine, and it wicked up all the spaces between the grommets and the wires quite nicely. Should be watertight now!
Grommets (the rubber kind) serve several useful purposes. They help weatherproof the penetration, though generally grommets aren't completely waterproof on their own. But the most important thing they do is to keep the wire's insulation from being scraped off by the sharp metal of the penetration. That's vital, and I didn't want to drive very much without solving that issue.
My first idea was to somehow suspend the wires so they didn't touch the metal, then form some silicone RTV around them. Once the RTV cured, in effect I would have manufactured a custom (and completely weatherproof) grommet. But I know from experience that RTV doesn't stand up all that well under full sun and weather exposure, so I searched around and found another similar material that is supposed to handle outdoors exposure better. This material starts out with the consistency of Duco glue, though – not as viscous as RTV, and therefore not quite as “moldable”.
Then a crazy idea occurred to me. What if...I took an ordinary rubber grommet and snipped through it, so that I could thread it onto the wire already in place? Then I should be able to stuff it into the hole, surrounding the wire. Then I could coat it with this new-fangled sealant and I'd have the best of all worlds.
So I tried it. Bottom line: it worked. The details: oh, man, is it a pain in the patoot to stuff a rubber grommet into a hole already occupied by wires! I used a small flat-blade screwdriver to get enough pressure on it to pop it in, one tiny little piece at a time. It took me about 20 minutes per grommet to get them in, and I had 6 grommets to do. Once I had all the grommets in place, sealing them up was easy. The new sealant seems to stick to the rubber material just fine, and it wicked up all the spaces between the grommets and the wires quite nicely. Should be watertight now!
Thursday, April 18, 2013
FJ Cruiser: the Rock Rails...
 I've been looking forward to installing the rock rails (or “sliders”) on our FJ, as they're one of the things that change the appearance. I got them on today, as you can see in the photos. These are the All-Pro APEX “Extreme Duty” rock rails, which I selected based on the many positive reviews I found online.
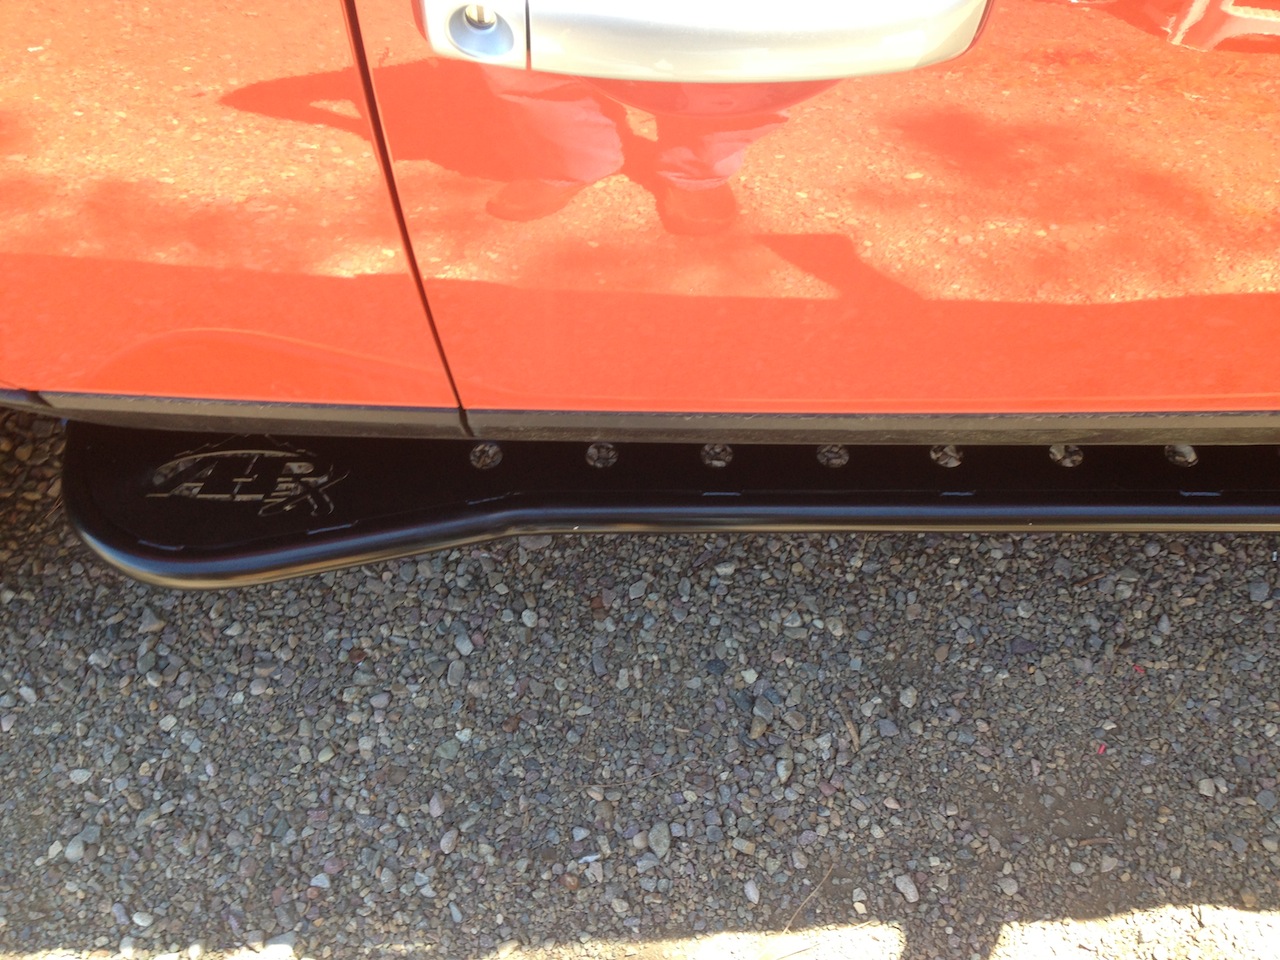 The folks at All-Pro have consistently been very helpful (perhaps taking pity on me, as they met me when I picked up my order). This was especially so with the rock rail installation, as I quickly discovered this morning that the instructions didn't seem to match what parts I had. With a couple of emails, the folks at All-Pro set me straight: the instructions were for their standard rock rails; the APEX rock rails are constructed slightly differently and have a simpler installation. Once I got myself educated, installing the rails was a snap. Each rail bolts directly to pre-existing threaded holes in the FJ's frame. The bolt holes in the rock rails are elongated to provide a little “slop” in the alignment, but in my case none was needed – the fit was perfect.
If you're not familiar with rock rails, they are designed to protect the side of your vehicle should you bang the side into a rock. This happens most often when your in a place where your vehicle is tilted sideways on rough or slippy-slidey ground. In these circumstances it's very easy for your vehicle to move a foot or more to one side as you try to drive through the patch. If there happens to be a bit rock (or wall) next to you, your vehicle might very well end up scraping against it. I'd much rather scrape these tough, relatively inexpensive rock rails than the thing sheet metal of the body!
FJ Cruiser: New Tailpipe...

All-Pro makes a replacement tailpipe, which I bought a couple of weeks ago and installed this morning. It is routed entirely up high, and much straighter than the stock tailpipe. The photo at right shows the new tailpipe installed (delineated by the red line I drew down its middle). The shock mount hanger is hard to see, but one of its mounting bolts is pointed to by the blue arrow.
The connection between the muffler and the tailpipe is via a dual bolt flange, which made this job look like it would be super easy – just remove two bolts and the old tailpipe comes out. But getting those two bolts loose was a major evolution, as they were very tightly in place. One of them I managed to turn with a socket wrench, using both arms with everything I could put into it. The second bolt I couldn't move with my arms at all. I went through some gyrations to get an impact wrench to bear on it, but even that wouldn't budge the bolt! In desperation, I put an 8" long box wrench on the bolt head, and used my boot to push the wrench using my legs – and that worked, though just barely. Once I got it to turn an entire turn, then I could work it with my socket wrench. What a pain!
Fortunately, the new one went in much more easily than the old one came out...
Evolution of Music, a Cappella...
I recognized everything up through the 1970s, and maybe half of the 1980s. Everything after that was new to me (and didn't make my ears happy!).
When I was a teenager, I was astonished when my parents forbade me from playing Joni Mitchel or Simon & Garfunkel on our family's record player. It was easier for me to understand why they didn't want to hear Crosby, Stills or Jimi Hendrix. They must have felt then as I feel today listening to this music of the 2000s...
When I was a teenager, I was astonished when my parents forbade me from playing Joni Mitchel or Simon & Garfunkel on our family's record player. It was easier for me to understand why they didn't want to hear Crosby, Stills or Jimi Hendrix. They must have felt then as I feel today listening to this music of the 2000s...
Makes Me Cry Every Time...
This is the third or fourth video of an Operation Smile patient I've seen. I cry every time, just trying to imagine the joy brought by this life-changing procedure...
What Happens...
If you wring out a sopping-wet washcloth in zero gravity? Watch:
On one level, this is a fascinating experiment and a great demonstration of one effect of gravity's absence.
On another level, it's a little sad that NASA has to resort to things like this in its efforts to justify the ISS. It would be ever so much easier to justify if the ISS was producing exciting, useful, or surprising science results, instead of parlor tricks...
On one level, this is a fascinating experiment and a great demonstration of one effect of gravity's absence.
On another level, it's a little sad that NASA has to resort to things like this in its efforts to justify the ISS. It would be ever so much easier to justify if the ISS was producing exciting, useful, or surprising science results, instead of parlor tricks...

Mystery Image...

Give up?
The brighter colors represent smaller numbers, the duller colors larger. The heat map shows the number of digits in the product of x and y, as expressed in Roman numerals.
Figuring out why there are visual patterns to the result is left as an exercise for the reader.
Yes, this is the work of Nick Berry – who else would it be?
Wednesday, April 17, 2013
House Finch Nest...

 Yesterday I stuck my iPhone up there to see if there were any eggs. To my surprise, the nest had five eggs in it. Taken together, these eggs seem to be about the same size as the mama bird, which seems unlikely. A little research shows they have between 2 and 6 eggs, though, so this probably isn't all that unusual.
Bowed, But Not Broken...
Check out the photo below, showing a small sheet of 1/2" plywood sitting in the roof rack of our FJ. I took this photo on Monday, when we were having some rain (about a tenth inch, nothing to get all that excited about). The sheet was perfectly flat the day before, but look at it now!
The rain hitting the top side of the plywood soaked into the wood, causing it to swell a bit. The bottom of the plywood remained dry, and therefore didn't swell. But the swelling is directional – the fibers of wood grow in diameter, but not in length. The grain of the top ply of this piece toward/away from the position of the camera, so the swelling occurs in the left/right direction. This swelling caused the bowing in the direction you can see.
Later on, the water soaked down further in the wood, to the next ply. At that point, the piece warped a bit in both directions, making a very odd-looking piece of wood.
Today (Wednesday) the piece has dried out, and is completely flat again...

The rain hitting the top side of the plywood soaked into the wood, causing it to swell a bit. The bottom of the plywood remained dry, and therefore didn't swell. But the swelling is directional – the fibers of wood grow in diameter, but not in length. The grain of the top ply of this piece toward/away from the position of the camera, so the swelling occurs in the left/right direction. This swelling caused the bowing in the direction you can see.
Later on, the water soaked down further in the wood, to the next ply. At that point, the piece warped a bit in both directions, making a very odd-looking piece of wood.
Today (Wednesday) the piece has dried out, and is completely flat again...

FJ Mods: Only When Running...
Some of the electrically-powered additions I'm making to our FJ Cruiser draw a lot of power – enough that leaving them on accidentally could easily run down the battery. Two obvious examples: the four “headlights” I've mounted to the roof, and the 2KW inverter that I have yet to install. To be safe (with respect to the battery) I'd prefer that these devices would only have power supplied to them when the engine is running. Unfortunately there is no simple way to do this. The stock vehicle does have power wires that are active only when the ignition is turned on – but that doesn't necessarily mean that the engine is running.
 So I designed and built a little circuit to solve this problem. It detects that the engine is running by sensing the battery voltage. When the engine is not running, the alternator is not running, and therefore the battery voltage will be something less than 12.8 volts. When the engine is running, the alternator is also running, and the voltage will be variable, but certainly over 13 volts (as measured in the FJ, it's generally over 14 volts. So a simple comparator circuit, com)paring the actual battery voltage to 12.9 volts, does the job quite nicely. The comparator's output drives a MOSFET relay driver, and the relay provides 30A that's on only when the engine is running. Since I was going to this trouble anyway, a minor addition also provides a separate output that is on whenever the ignition is on. This duplicates something already in the truck, but it does it with a separate relay and fuse – better than tacking it onto the stock system.
 Here you see it all installed. I put a pair of LEDs on the front, more for testing than anything else. The relays are the four little cubes off to the right.
This simple little circuit provides a very clean way to power those “big draw” devices without worrying about leaving them on while the engine is off. For we ancient and forgetful ones, this is very comforting :) It was also very satisfying for me to be able to design, build, and debug an old-fashioned analog electronic circuit – it's been quite a few years since the last time I'd done that!
 So I designed and built a little circuit to solve this problem. It detects that the engine is running by sensing the battery voltage. When the engine is not running, the alternator is not running, and therefore the battery voltage will be something less than 12.8 volts. When the engine is running, the alternator is also running, and the voltage will be variable, but certainly over 13 volts (as measured in the FJ, it's generally over 14 volts. So a simple comparator circuit, com)paring the actual battery voltage to 12.9 volts, does the job quite nicely. The comparator's output drives a MOSFET relay driver, and the relay provides 30A that's on only when the engine is running. Since I was going to this trouble anyway, a minor addition also provides a separate output that is on whenever the ignition is on. This duplicates something already in the truck, but it does it with a separate relay and fuse – better than tacking it onto the stock system.
 Here you see it all installed. I put a pair of LEDs on the front, more for testing than anything else. The relays are the four little cubes off to the right.
This simple little circuit provides a very clean way to power those “big draw” devices without worrying about leaving them on while the engine is off. For we ancient and forgetful ones, this is very comforting :) It was also very satisfying for me to be able to design, build, and debug an old-fashioned analog electronic circuit – it's been quite a few years since the last time I'd done that!
Is This Supposed to be Obama?
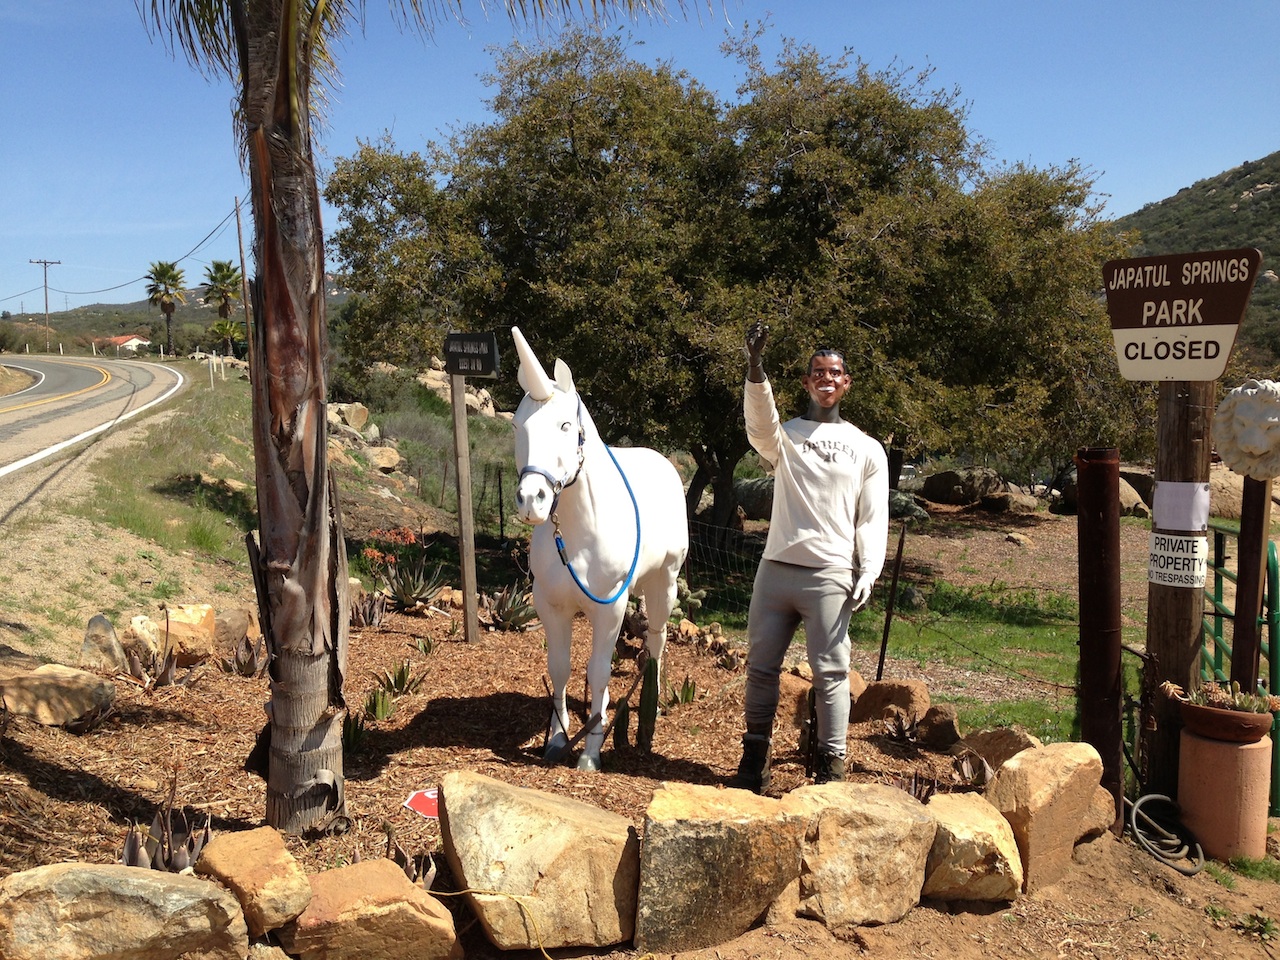
These “statues” of a black man and a white horse are along Japatul Valley Road, just north of the intersection with Lyons Valley Road. The park signs are the same style as a county park, but oddly are on posts marked “private property”. And then there's the statue, which bears a remarkable resemblance to Barack Obama. That implies some sort of message, but we're not at all sure what that message might be. If you google “Japatul Springs Park”, you won't get any hits showing it as a park in any jurisdiction.
There's much to be confused about here :)

There's much to be confused about here :)
Did Life Begin Before the Earth Existed?
Start with an unproven (but plausible) hypothesis: that the complexity of life grows at a constant exponential rate, just as so many other natural processes do. Or, if you will, just like Moore's Law of integrated circuit complexity. Then extrapolate backwards – given the complexity of life today, and an observed rate of growth, when did life have a complexity of 1 (that is, when did life begin)?
Two scientists have done this math, and have arrived at a date of roughly 9.5 billion years ago. That's well before the Earth (or the Sun, for that matter) existed.
What does this mean?
One very real possibility is that the scientists are mistaken for some reason. After all, they don't have any direct observational evidence for this date, just the extrapolation of a hypothesis – very weak ground to rest a theory on.
The other possibility is that they are correct, and that would mean that life originated before the Earth did – and that the Earth was “seeded” with life through some mechanism (comet collisions are a frequently cited candidate).
It's an interesting ponder...
Two scientists have done this math, and have arrived at a date of roughly 9.5 billion years ago. That's well before the Earth (or the Sun, for that matter) existed.
What does this mean?
One very real possibility is that the scientists are mistaken for some reason. After all, they don't have any direct observational evidence for this date, just the extrapolation of a hypothesis – very weak ground to rest a theory on.
The other possibility is that they are correct, and that would mean that life originated before the Earth did – and that the Earth was “seeded” with life through some mechanism (comet collisions are a frequently cited candidate).
It's an interesting ponder...
Tuesday, April 16, 2013
Quote of the Day...
From Defending Enterprise:
I find that a politician's syntax matters less when he cuts taxes.Oh, yes indeedy!
This Is For Boston!
At a Muse concert last night, lead singer Matthew Bellamy called out “This is for Boston!” and then:
Maybe all is not lost...
Maybe all is not lost...
Subscribe to:
Posts (Atom)